
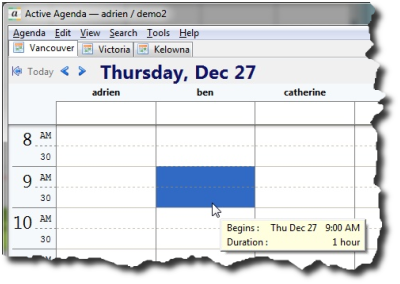
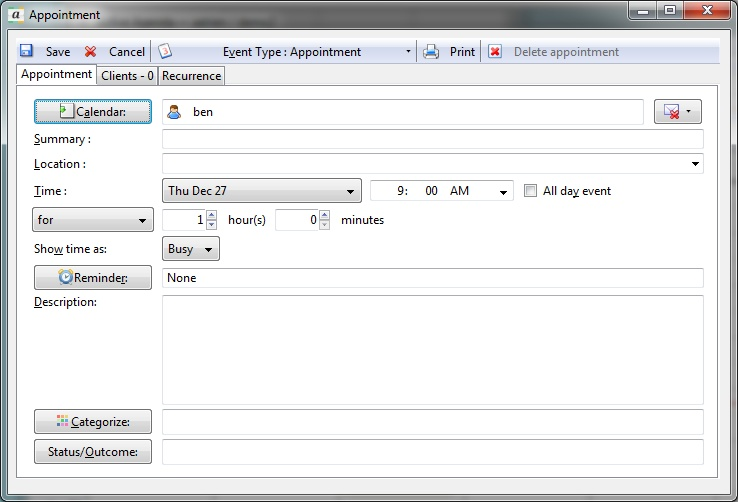
The first step is to navigate to the correct date. Select the time on the appropriate calendar by clicking the starting interval and dragging to the ending interval. Right click on the selected intervals and select “New Appointment” to open the appointment dialogue box. Enter the information regarding the appointment and click Save to schedule the appointment. See the table below for a description of the different fields.
| Field | Description |
| Calendar | The calendar this appointment is saved to. To save the appointment to a different calendar, click the ‘Calendar’ button and check a different calendar. |
| Summary | The summary or title of the appointment. The text appears in the appointment box and should be generally be kept brief at 1-4 words. If the summary is left empty the client’s name/phone number will be used, or the category name if there is no client attending. |
| Location | The location of the appointment. You can pick one of the predefined locations (known as Common Locations) from the drop down menu, or if none of those apply, type in your own. |
| Time | The time the appointment begins. You can define the length of the appointment by specify its duration, or end time. |
| Show time as | Specify if this time should be considered “Busy” or “Free” for the calendar(s) the appointment is being saved to. The program will not let you schedule overlapping busy appointments. |
| Reminder | Schedule an email or popup reminder for this appointment |
| Description | This large textbox is where you can put other notes or details about the appointment. |
| Categorize | This button will popup a category selection dialog box, where you can check the categories that apply to this appointment. Categories are predefined by your Organization Administrator. Always apply the applicable categories. |
| Status/Outcome | The status/outcome of the appointment. Common Status/outcomes include “Cancelled”, “Rescheduled”, “Attended” etc. In the case of multiple clients attending an appointment, each client has his or her own Status/Outcome. |
Client appointments
Each client in Active Agenda is a record. You schedule client appointments by adding the applicable client record(s) to the appointment. You can add multiple clients to a single appointment.
To schedule a client appointment:
- Open the appointment dialog box
- Click the “Clients” tab
- Click “Add client…”
- Search to see if a client record already exists for the applicable client using their first or last name
- If found check “Attending” and click OK
- … else if not found click “New client…” to create a new Client record and provide the following:
- First name
- Last name
- Phone number
- Click “Save”
- Check “Attending” for the new client and click OK
- Click “Save”
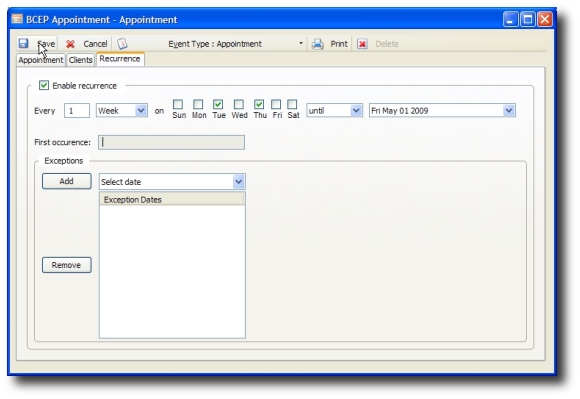
Recurrence
Recurrence allows you to create an appointment that recurs at a specified interval. For example you could create a staff meeting to recur on the 2nd Tuesday of each month. To use this feature open the appointment dialog box and click the ‘Recurrence’ tab. Click ‘Enable recurrence’ to turn on recurrence. Recurrence has three parameters:
- Frequency : The first text field. How often the appointment occurs.
- Interval : Can be day, week or month. For example, setting a Frequency of 2 and an Interval of ‘Week’ would have the appointment recur every 2nd week.
- Limit : When the recurrence ends, Limit can have 3 values:
- forever: No limit set
- until: Until the date specified
- for: A specified number of occurrences
Modifying recurring appointments
When modifying a recurring appointments you will be given 3 options:
- This occurrence only
- This and all future occurrences
- All occurrences
When selecting ‘All occurrences’, your changes will apply to the to the original occurrence of the appointment and any changes to the starting and ending dates will be ignored.